This tutorial certainly won't cover every feature of elm-3d-scene, but it
should give you a decent grasp of the core concepts that are involved in setting
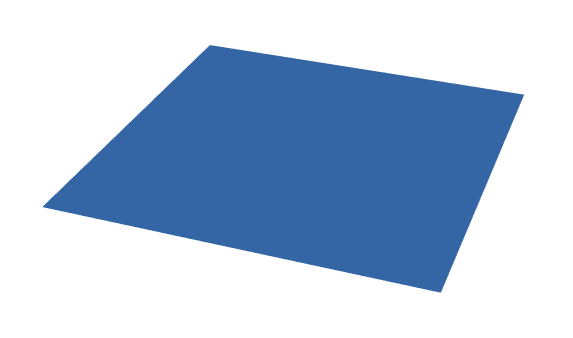
up any elm-3d-scene...scene. We'll be rendering a simple blue square - it
will look like this:
elm-3d-scene makes extensive use of a few other ianmackenzie/* geometry-related packages:
elm-geometryfor modules such asPoint3d,Direction3d,Axis3d,LineSegment3d, andTriangle3delm-unitsfor modules such asLength,Angle,Pixels, andLuminanceelm-3d-cameraforCamera3dandViewpoint3d
You'll also need avh4/elm-color.
As a result, when setting up pretty much any app that uses elm-3d-scene, you
will need to run something like:
elm install ianmackenzie/elm-3d-scene
elm install ianmackenzie/elm-geometry
elm install ianmackenzie/elm-units
elm install ianmackenzie/elm-3d-camera
elm install avh4/elm-color
In more sophisticated apps, you will also need to install elm-triangular-mesh.
Entities are the visible objects in a scene. In general, they have some geometry that defines their shape and a 'material' that defines their color (which can include things like texturing and reflectivity). In this scene, there's only one entity:
entities =
    [ Scene3d.quad (Material.color Color.blue)
        (Point3d.meters -1 -1 0)
        (Point3d.meters 1 -1 0)
        (Point3d.meters 1 1 0)
        (Point3d.meters -1 1 0)
    ]
Here, we've constructed a single blue square by calling Scene3d.quad
with a constant color material
and the four corner points
of the square in counterclockwise order. (Scene3d.quad can also be used to
create rectangles, parallelograms,
trapezoids etc.)
Note that entities are always constructed using real-world units - this example uses meters but you can also use feet, centimeters etc. Using real-world units becomes very important later on when using realistic lighting!
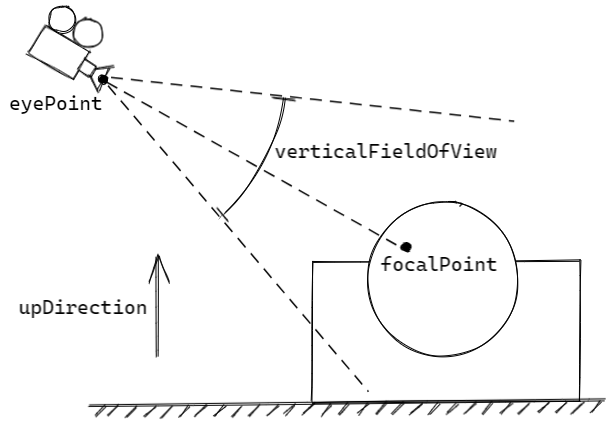
Once we have some entities to render, we need to define a virtual 'camera' that will be used to render the scene:
camera =
    Camera3d.perspective
        { viewpoint =
            Viewpoint3d.lookAt
                { eyePoint = Point3d.meters 5 2 3
                , focalPoint = Point3d.origin
                , upDirection = Direction3d.positiveZ
                }
        , verticalFieldOfView = Angle.degrees 30
        }
Here, we've used the Camera3d and Viewpoint3d modules from elm-3d-camera
to define a camera:
- Located at the point with coordinates (5, 2, 3) in meters;
- Looking towards the origin point (the point with coordinates (0, 0, 0));
- Oriented so that the positive Z direction appears to be up;
- And using perspective projection, with a vertical field of view of 30 degrees (a reasonable default for realistic rendering).
The Viewpoint3d
module has several additional functions for defining the position and orientation of
cameras, and you can use Camera3d.orthographic
if you want to use orthographic projection
instead.
Finally, to actually render the scene into an HTML element we can include on our
page, we can use Scene3d.unlit
since our scene doesn't involve any lighting effects. Here's the complete
program:
module HelloWorld exposing (main)
import Angle
import Camera3d
import Color
import Direction3d
import Html exposing (Html)
import Length
import Pixels
import Point3d
import Scene3d
import Scene3d.Material as Material
import Viewpoint3d
main : Html msg
main =
Scene3d.unlit
{ entities =
[ Scene3d.quad (Material.color Color.blue)
(Point3d.meters -1 -1 0)
(Point3d.meters 1 -1 0)
(Point3d.meters 1 1 0)
(Point3d.meters -1 1 0)
]
, camera =
Camera3d.perspective
{ viewpoint =
Viewpoint3d.lookAt
{ focalPoint = Point3d.origin
, eyePoint = Point3d.meters 5 2 3
, upDirection = Direction3d.positiveZ
}
, verticalFieldOfView = Angle.degrees 30
}
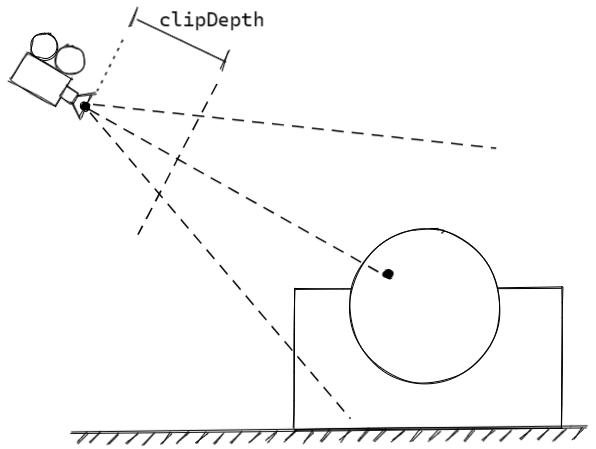
, clipDepth = Length.meters 1
, background = Scene3d.transparentBackground
, dimensions = ( Pixels.pixels 800, Pixels.pixels 600 )
}Note that Scene3d.unlit takes a few more parameters in addition to entities
and camera:
clipDepthdefines how close objects can get to the camera before they're cut off. In this example, you can imagine the camera having an invisible screen one meter in front of the camera that would crop anything that got too close.backgroundspecifies the background color to use when rendering. In this case we've used a transparent background so that the background color of the HTML underneath (or any other HTML content that happens to be underneath!) will show through.dimensionsdefines the size in pixels that the scene should be rendered at. Here we use a hardcoded size for simplicity.
This has just scratched the surface of elm-3d-scene - check out the examples
to see how to:
- Add animation to your scene (using Elm techniques you already know!)
- Add interactivity such as an orbiting camera
- Use built-in shapes such as balls and blocks
- Add realistic lighting and shadows
- Define custom shapes using triangular meshes
- Apply textures to your objects
- Support high dynamic range (HDR) scenes