Q&A: How to find an appropriate segmentation method for my data sets (2)?
See also a similar Q&A for a different image here:
- How to find an appropriate segmentation method for my data sets (Example 1)?
- How to find an appropriate segmentation method for my data sets (Example 3)?
Answer provided on 7th of April 2021.
CiliaQ Preparator offers multiple methods to perform image segmentation:
- Segmentation based on a standard intensity threshold (e.g. determined by an automatic algorithm)
- Using a hysteresis threshold
- Using a custom developed method that we coined “Canny3D” and that employs edge detection
The different methods are described in detail in the CiliaQ publication (https://doi.org/10.1140/epje/s10189-021-00031-y).
In the following, I document how I searched for and optimized the settings for an exemplary confocal image stack of cilia in a tissue.
First, take a look at your image, in particular to the channel that you want to segment (you can do this in the maximum projection of the image): Extract the channel that you use for cilia reconstruction (= that you want to segment) by the command Image > Duplicate, and enter the channel number of the respective channel. Via Image > Adjust > Brightness/Contrast you can drag down the maximum displayed value to better see cilia with weak intensity levels.

Maximum-intensity-projection image of the image.
CiliaQ Preparator detects the pixels=voxels belonging to the cilium using intensity threshold or edge detection methods. In either case, this means, that the intensities of the cilia compared to the background are relevant for the "segmentation" process. When looking at this image in this context, the following challenge emerges for segmentation with CiliaQ Preparator:
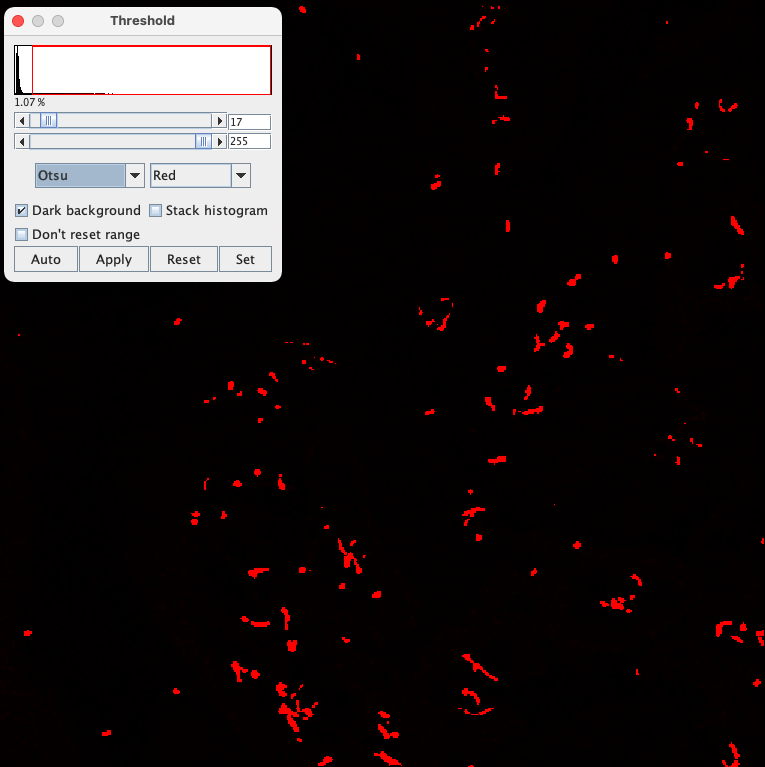
The ciliary intensity level largely varies, which makes it difficult to apply an intensity threshold to separate cilia and background, because you may find a threshold that works to separate a subset of cilia from background but not all cilia or you will be able to detect all cilia but at the same time also detect background structures as cilia. One can try this out: Go to Image > Adjust > Threshold and test different automated threshold methods (which you can also select in CiliaQ Preparator in the settings dialog). Such methods use one intensity threshold for the entire image. It becomes apparent that an intensity threshold that can well detect dimmer cilia will at the same time also detect a lot of the background staining. To conclude, you cannot directly apply such a threshold because intensity levels are too heterogeneous among cilia and among different image regions.

Thresholded image. By selecting "Otsu" in the dialog called by Image > Adjust > Threshold, the threshold algorithm "Otsu" was used to automatically determine an intensity threshold value that may well separate foreground (which in this case represents cilia) and background. The threshold value can be read from the dialog ("32"). The consequence of applying this threshold is automatically visualized in the image. Red indicates pixels whose intensity level lies at or above the threshold of 32 and which, thus, are considered "ciliary" pixels. Black indicates pixels whose intensity level lies below the threshold of 32 and which, thus, are considered "non-ciliary" or "background" pixels. Because the intensity level of cilia and some background structures is similar, the threshold could not separate cilia from background and thus yielded also many "ciliary" pixels that represent background structures. At the same time, some cilia were incompletely detected.
This problem can be solved by using additional image processing steps before segmentation. Such steps (i.e. Subtract Background, Divide by Background, Gaussian Blur) are also offered in CiliaQ Preparaptor and thus can be automatically performed before segmentation in CiliaQ Preparator. In the imagehere a Subtract Background step makes sense as it may equalize the intensity differences between regions and may remove background staining and/or labeling of the cell soma. Because structures other than cilia are generally wider than the filamentous cilia, applying a background subtraction with a small radius can remove the wider structures while keeping small ones like the cilia.
To search for a good radius for background subtraction, you can visualize the effect of different subtract background radiuses manually as follows:
- Go to the Brightness and Contrast Window and press "Reset" to remove the labeling from the intensity threshold.

Brightness & Contrast window in ImageJ. Click the "Reset" button to remove a labeling by intensity threshold. You may then need to adapt the maximum again to make dim cilia structures visible.
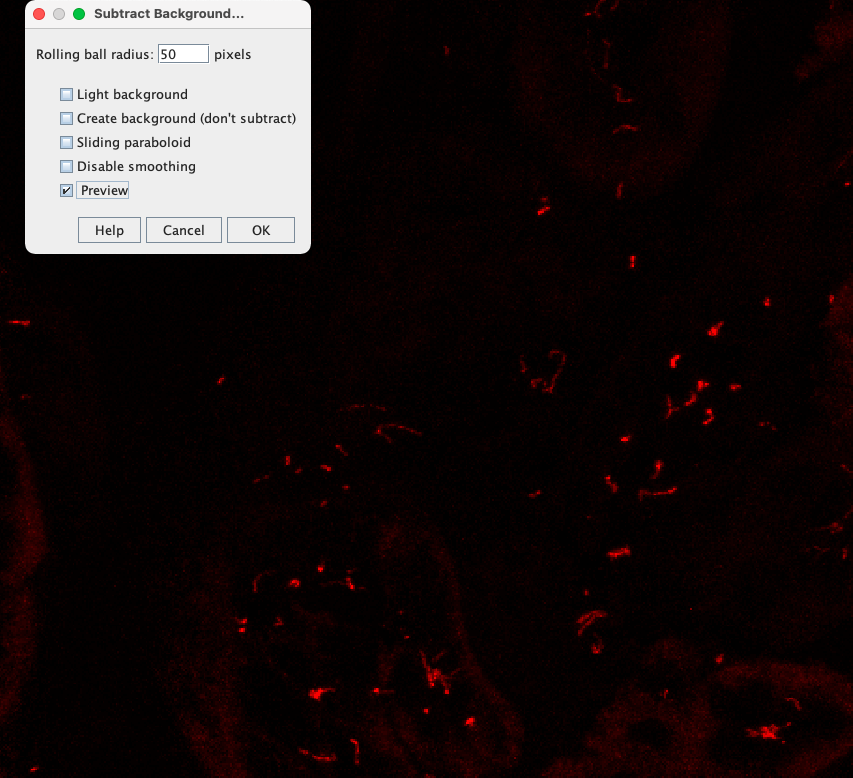
Check the "Preview" checkbox to live update the effect of Background Subtraction in the image while modifying the "Rolling ball radius".
When decreasing the radius to 5 pixels you can see that the cellular labeling vanishes while cilia that are narrower than 5 pixels hardly vanish:

Adjusting the "Rolling ball radius" to 5 pixels.
However, there will be still large intensity differences among cilia, which can make analysis difficult. By further decreasing the radius you may even be able to decrease intensity differences between cilia:

Adjusting the "Rolling ball radius" to 1 pixel.
To better see this, one can apply the "Subtract Background" method with a radius of 1 pixel and then adjust the displayed maximum in the B&C window: you can see that bascially only cilia are left now:

Adjusting the maximum in the B&C window allows to better appreciate the effect of a Background Subtraction with a "Rolling ball radius" of 1 pixel.
Now we have removed the background, but some cilia look "gappy". Bridging such gaps is possible by employing a Gaussian Blur - which is also available as a setting in CiliaQ Preparator. To manually perform this go to Process > Filters > Gaussian Blur. You can also use a "Preview" checkbox in the Gaussian Blur dialog to live update the image based on the radius you set. This allows you to adjust and select an optimal radius.

Applying a Gaussian Blur.
Now, after finding two methods to improve the image before segmentation, we still need to find a good threshold method. You can play around with threshold methods again using the function Image > Adjust > Threshold, and see how different methods perform. You will find methods that pick up too much background still and others that pick up to few of the cilium. For example, the "Triangle" method reveals almost all cilia but detects also background structures while the "Otsu" method reveals almost exclusively pixels coming from cilia but also misses parts of some cilia.

Testing different intensity-threshold methods for the background-subtracted and blurred image. The Triangle method reveals almost all cilia but detects also background structures. The Otsu method reveals almost exclusively pixels coming from cilia but also misses parts of some cilia.
In such cases a hysteresis threshold can be helpful (see CiliaQ publication (https://doi.org/10.1140/epje/s10189-021-00031-y) to read what it means). In more simple words, with the hysteresis threshold, one can use the too harsh threshold to find cilia and the too low threshold to detect the entire cilium.
Unfortunately, it is not trivial to visualize the hysteresis method manually. But you can simply test it by running it accordingly in CiliaQ Preparator. We open again the original image stack for which we explored settings and run it in CiliaQ Preparator:


Setting up CiliaQ Preparator to perform the Subtract Background method and the Gaussian Blur to improve the image before segmentation. We enter the radiuses for the two methods according to what we found best during the manual testing procedure described above.
In the hysteresis threshold method we then select the threshold methods that we found good to detect all cilia pixels while also background structures (low threshold) and to purely detect cilia pixels exclusively / with high fidelity (high threshold):

Setting up the Hysteresis threshold method in CiliaQ Preparator.
In the CQP.tif file produced by CiliaQ Preparator, you can assess cilia deteciton as explained in the user guide under CiliaQ Editor.

Output file of CiliaQ Preparator employing a hysteresis threshold - To obtain the shown image, a maximum projection of the output stack was created, only the segmented and the raw channel were selected in the channels tool (Image > Color > Channels tool, set to "Composite" mode, check only the segmented and the raw channel), the segmented channel was colored in Cyan (select with the bar below the image the segmented Channel and in the channels tool, go to More > Cyan) to better see the detected cilia, and Brightness&Contrast were slightly adjusted for both channels.
It becomes apparent that with this methodology we are able to detect most of the cilia, but some are still sparsely detected only.
Lastly, we can try the Canny3D method employing Edge detection. Unfortunately, this method cannot directly be tested manually, but one can test this by running the image in CiliaQ Preparator. So we open the 3D image for which we explored settings now and run it in CiliaQ Preparator. This time we do enter only the subtract background method because the Blur is also applied in Canny3D anyways (and can be set in the Canny3D dialog):


Setting up CiliaQ Preparator to employ "Canny3D" for edge detection.
When assessing the output image by Canny3D we see that you were able to detect all cilia with that method. However, a little bit of background structures were detected as well (orange circle). These, however, can be easily removed using CiliaQ Editor later.

Output file of CiliaQ Preparator employing Canny3D - To obtain the shown image, a maximum projection of the output stack was created, only the segmented and the raw channel were selected in the channels tool (Image > Color > Channels tool, set to "Composite" mode, check only the segmented and the raw channel), the segmented channel was colored in Cyan (select with the bar below the image the segmented Channel and in the channels tool, go to More > Cyan) to better see the detected cilia, and Brightness&Contrast were slightly adjusted for both channels.
For the present image it is really hard to find a good segmentation method for all cilia because cilia and background are so heterogeneous and intensity levels of cilia and background structures largely overlap. In the end one needs to decide which bias is better to take - in any case, to be precise, one will have to perform a little bit of editing with CiliaQ Editor. One can either use the hysteresis based threshold method and manually add cilia pixels that are not detected by using CiliaQ Editor or one can use the Canny 3D method and remove incorrectly as-cilia-detected structures (orange circle in image above).
What one also needs to consider in this image is that in cases where a lot of cilia are closeby (green circle), one may not be able to automatically separate adjacent cilia. This is the case with either of the two methods and requires editing. If you can distinguish the cilia by eye, you may separate them by correcting the mask in CiliaQ Editor. But with Canny 3D you will run much more into these issues because it segments the cilia as broader structures than most intensity-threshold bases methods due to detecting and including the edges of the cilia. Thus, using Canny3D, one more likely fuses adjacent cilia.
More specifically, for a structure like this (left picture below), CiliaQ will fuse all pixels into one "ciliary object" because they are adjacent. If you do not wish that this is happening, you will have to remove pixels in CiliaQ Editor to make it look like this (right picture below) so that it will be detected as three individual cilia:


Left: before editing. Right: after editing.
Finally, two last notes:
- Of course, before accepting the settings as good for a data set one should look into multiple images.
- An alternative method to circumvent the heterogeneity of intensity differences between regions in an image may be to first crop the image into multiple images by regions. E.g. if you have one region with generally higher intensity level than another you may to consider to split the stack into multiple regions (e.g. by using rectangular ROIs and the Image > Crop function in ImageJ, saving the different regions as individual image stacks, and running them separately in the CiliaQ pipeline).